Product Photography for Beginners: How to Tell a Story With Simple Objects

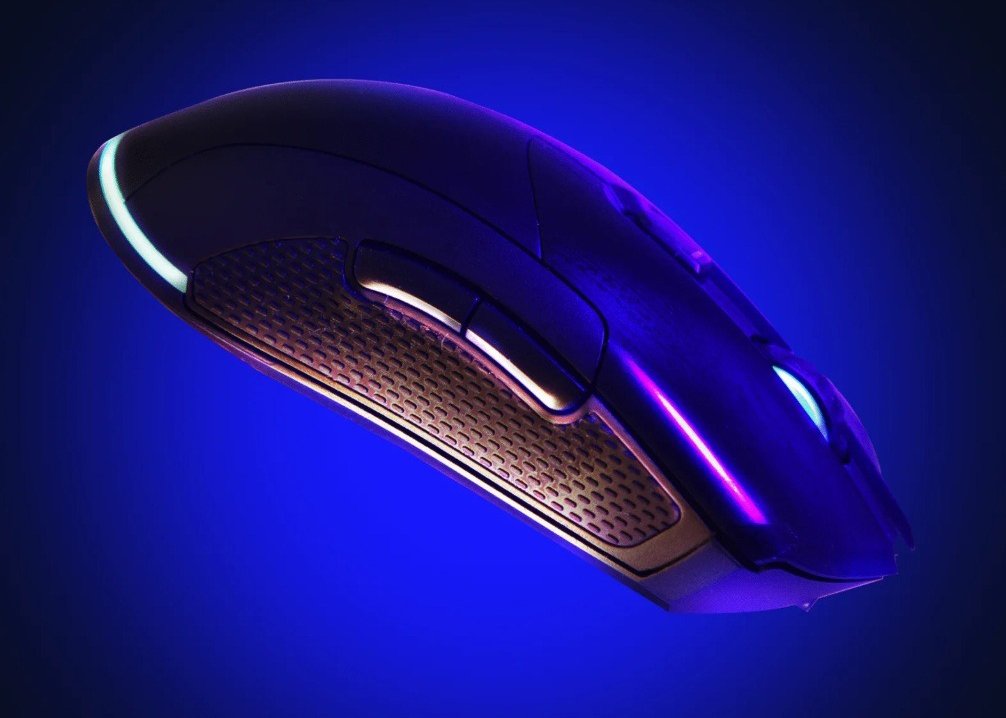
At first glance, the photo below looks straightforward: a single computer mouse, floating against a glowing blue backdrop. No cluttered desk, no busy props — just clean design illuminated by light. But look closer. The subtle gradients of purple and blue lighting highlight the mouse’s curves, grip texture, and buttons, giving it personality. It feels futuristic, precise, almost like a piece of high-tech gear waiting to be used. Suddenly, it’s not just a mouse — it’s innovation, speed, and performance captured in one frame. This is the power of product photography: turning everyday objects into compelling visuals that communicate value and identity. And the best part? You don’t need a high-end studio to create images like this. With thoughtful lighting and intentional composition, you can make products look market-ready.   Table of Contents Introduction What Makes Product Photography Different? Start With a Clear Message Showcase Products With Intention Composition Tips Made Simple Use the Rule of Thirds Leave Space for Breathing Room Think in Layers Use Lighting to Elevate Design Choose Colors That Match the Brand Keep Your Edits Clean and Consistent Practice With These Simple Prompts Learn by Studying Great Product Shots Final Thoughts   What Makes Product Photography Different? Product photography isn’t just about showing what something looks like. It’s about shaping how customers feel about it. The mouse image above doesn’t only show its design — it communicates sleekness, technology, and performance through color, contrast, and mood. That’s storytelling in product photography. When done right, a product photo doesn’t just display — it persuades.   Start With a Clear Message Before you take the shot, ask: What story should this product tell? The mouse photo works because it conveys innovation and precision. By isolating it on a dark background and using neon-inspired lighting, the photographer communicates a futuristic, performance-driven identity. Some beginner-friendly themes to try: Minimal elegance → neutral tones, soft shadows. High-tech feel → glowing light, metallic reflections. Lifestyle context → product in use (e.g., mouse with a gaming setup). Choose one idea per shoot. Simplicity is stronger than clutter.   Showcase Products With Intention You don’t need dozens of props to tell a story. Sometimes, the product itself is the story. Notice how the mouse photo uses no extra accessories. The textured grip, sharp lines, and glowing scroll wheel stand out on their own. This minimal approach keeps the focus where it belongs: on the product. When planning a product shot: Highlight the feature that sets it apart (shape, texture, or color). Keep backgrounds simple, unless they support the brand’s identity. Shoot multiple angles to show both form and function.   Composition Tips Made Simple How you frame your product makes all the difference. In the mouse photo: The product floats slightly off-center, adding energy to the composition. Negative space around it emphasizes its form. Layers of light (dark backdrop, glowing center, highlighted edges) create depth. Beginner tips: Rule of Thirds → Position the product along invisible grid lines for balance. Leave Space → Empty space adds focus and works great for ads or text overlays. Think in Layers → Foreground, product, and background should work together to create dimension.   Use Lighting to Elevate Design Lighting is what turns a basic photo into a product showcase. In the mouse image, dramatic side and back lighting highlight the curves and textures. The glowing blue creates mood, while the purple accents suggest energy and innovation. Tips for beginners: Side light → emphasizes shape and detail. Back light → creates glow, perfect for tech or luxury items. Soft front light → works for catalog shots where clarity is key. Pro tip: Experiment with LED lights or colored gels for a branded look.   Choose Colors That Match the Brand Colors aren’t just decoration — they tell the story of the product. In the mouse photo, blue and purple lighting create a futuristic and high-performance vibe. Imagine how different it would feel with warm yellow light — suddenly it would feel casual instead of high-tech. Guidelines for color use: Cool tones → modern, sleek, innovative. Warm tones → cozy, approachable, lifestyle-oriented. High contrast → bold, energetic, attention-grabbing. Keep the palette consistent to strengthen brand identity.   Keep Your Edits Clean and Consistent Editing is about refinement, not distraction. In the mouse image, edits enhance the glow and clarity without overprocessing. The result is polished but believable. Editing basics: Adjust exposure so products look evenly lit. Boost contrast to make details pop. Stay consistent if shooting a whole product line. Lightroom, Photoshop, or even mobile apps like Snapseed can help beginners achieve a clean look.   Practice With These Simple Prompts The mouse image shows how one product with great lighting can tell a story. Try these setups at home: “Tech Precision” – photograph a single gadget with cool-toned lighting. “Luxury Close-Up” – zoom in on product textures (e.g., leather, glass, or brushed metal). “Everyday Hero” – shoot a product in a simple lifestyle setting (like a coffee mug on a desk). “Collection Shot” – line up multiple versions of the same product for a catalog feel.   Learn by Studying Great Product Shots The mouse photo works because it borrows principles of professional product photography: clean background, intentional lighting, and a strong mood. To improve your skills: Study tech product shots from brands like Apple, Logitech, or Razer. Notice how they use light to highlight design. Try recreating their setups with your own products. It’s like learning music by covering a favorite song — practice teaches structure until you find your own style.   Final Thoughts The illuminated mouse demonstrates an essential truth: impactful product photography is not defined by costly equipment or elaborate setups. What matters is the clarity of vision, the quality of light, and the perspective you choose. When you frame a product around its story — whether it conveys speed, sophistication, or comfort — you elevate it beyond its function. It becomes a message, an experience, a reason to connect.   Begin with

Product Photography for Beginners: How to Tell a Story With Simple Objects Read More »

Still Life Photography for Beginners: How to Tell a Story with Everyday Objects

At first glance, the photo below looks simple: three plain white vases placed side by side. No flowers, no dramatic props — just shapes and shadows against a dark background. But look closer, and you’ll notice how much story they carry. Each vase has a different form — tall and elegant, strong and steady, round and playful. Together, they suggest contrast and harmony, individuality and connection. The soft side-lighting adds depth, making them feel almost like characters in a quiet conversation. This is the power of still life photography: turning ordinary objects into visual storytellers. And the good news? You don’t need a studio or fancy props to create images like this. With a thoughtful eye and simple techniques, you can make everyday objects — from vases to books to coffee cups — speak volumes.   Table of Contents Introduction What is Storytelling in Still Life? Start With a Simple Idea Choose Meaningful Objects Composition Tips Made Simple    Use the Rule of Thirds    Leave Space    Think in Layers Use Natural Light to Create Mood Think About Colors Keep Your Edits Natural Practice With These Simple Prompts Learn by Looking Final Thoughts.   What is Storytelling in Still Life? Still life photography is more than just arranging pretty objects. It’s about creating emotion or meaning through the things you choose to show — and how you show them. Think back to the three vases above. Alone, each is just a simple object. But placed together, they form relationships: contrast in their shapes, balance in their spacing, and unity in their shared color. Suddenly, they’re no longer just vases — they’re a quiet story about difference and togetherness. That’s storytelling. Or picture a half-drunk cup of coffee, an open book, and soft morning light. It might remind you of a slow Sunday, a peaceful moment, or even a bit of loneliness. The objects don’t have to move or speak. With the right setup, they’ll speak for themselves.   Start With a Simple Idea Before you grab your camera, ask yourself:What feeling or message do I want this photo to share? The vases work because they focus on a single theme: simplicity and balance. By limiting the setup to just three objects, the photographer lets their forms and light tell the story. Here are a few other beginner-friendly ideas: “Calm morning” → candle, tea, blanket “Messy desk” → notebook, glasses, pens scattered “Childhood memories” → old toy, photo frame, crayons Pick 1 emotion or theme. Don’t overthink it — the simpler the better.   Choose Meaningful Objects You don’t need to go out and buy props. The best still life setups often come from things you already own — and that’s what makes your photos unique. Notice how the vases are ordinary household items, but chosen for their differences in shape. They aren’t valuable antiques or dramatic centerpieces — they’re everyday objects elevated through arrangement and light. Choose items that: Reflect the theme you picked Have personal or visual meaning Work well together in terms of color or shape Example: A vintage watch, a handwritten letter, and a faded rose might tell a story of nostalgia or lost time.   Composition Tips Made Simple How you arrange objects is just as important as what you choose. Look at the vase photo again: The tallest vase is placed slightly left, the medium one in the middle, and the rounder vase to the right. This staggered arrangement creates balance without symmetry. The space between them gives each object “room to breathe,” making the composition feel calm and uncluttered. The background acts as a simple stage, allowing the vases’ shapes and shadows to stand out. Here are 3 beginner tips: Use the Rule of ThirdsInstead of placing your subject in the center, divide the frame into 9 equal parts. Notice how the vases are not crammed into the center — their placement naturally feels aligned to these invisible lines. Leave SpaceThe gaps between the vases create rhythm. Without them, the photo would feel heavy and crowded. Think in LayersThe dark background (back layer), the vases (middle layer), and the table surface (front layer) create depth. Even with just three objects, the image feels dimensional.   Use Natural Light to Create Mood Light is everything in photography — especially in still life. The vases are lit from the side, which creates gentle shadows and gives each curve definition. This side lighting transforms plain white ceramic into something sculptural and expressive. As a beginner, use natural window light: Side light (like in the vase photo) adds shadows and mood. Front light gives a clean, even look but less depth. Tip: Shoot near a window at different times of day and see how the mood changes.   Think About Colors Colors Colors can tell a story too. The vase photo uses a neutral palette: white objects against a brown backdrop. This simplicity keeps the focus on shape and light rather than color distractions. Warm backgrounds (like brown, wood, or beige) feel cozy and timeless. Cool backgrounds (like blue or gray) feel calm or distant. Pro tip: Start with 1–2 colors, just like in the vase setup. Neutral tones let form and lighting shine.   Keep Your Edits Natural Editing helps bring your story to life — but don’t overdo it. In the vase example, editing was likely subtle: a touch of contrast, controlled brightness, and preserved natural shadows. Nothing flashy, just adjustments that let the objects and light speak for themselves. Try free editing apps like: Snapseed (iOS & Android) Lightroom Mobile Start with small adjustments: Brightness (lighten up dark images) Contrast (add depth) Warmth (make the photo feel cozier or cooler).   Practice With These Simple Prompts One of the best ways to grow your still life skills is to practice small setups. The three vases are a perfect example: just a few objects arranged with intention, photographed with simple light. Here are some prompts you can try at home: “Morning Routine” – toothbrush,

Still Life Photography for Beginners: How to Tell a Story with Everyday Objects Read More »

camera, photographer, photography-7726802.jpg

Behind the Lens: A Day in the Life of a Professional Photographer

Welcome to a behind-the-scenes look at the life of a professional photographer. In this article, we’ll explore the day-to-day experiences, challenges, and creative processes that make up the world of professional photography. Whether you’re an aspiring photographer or simply curious about what goes on behind the lens, this journey will provide valuable insights.   Table of Contents Introduction Morning Routine and Preparation On Location: A Photoshoot Day Behind the Camera: Capturing the Moment Post-Processing and Editing Client Interaction and Communication Business Operations and Administration FAQs: Common Questions About Professional Photography Conclusion   1. Introduction Professional photography is more than just clicking a button; it’s a blend of art, technique, and business. It requires a photographer to wear multiple hats, from creative visionary to business manager. Let’s dive into a typical day in the life of a professional photographer to see what goes into creating stunning images.     2. Morning Routine and Preparation Gear Check A professional photographer’s day begins with a meticulous gear check. This involves ensuring that camera bodies and lenses are not only clean but also in optimal working condition. Spare batteries and memory cards are essential to prevent disruptions during a shoot. It’s not just about having the equipment; it’s about having reliable and functional gear that won’t compromise the quality of the images.   Reviewing the Brief The client’s brief is the roadmap for the shoot. Professional photographers scrutinize the brief to understand the client’s specific requirements, expectations, and objectives. It’s about more than just reading the words; it’s about comprehending the client’s vision and translating it into a visual language through photography.   Location Scouting Before the actual shoot, professional photographers often embark on location scouting missions. This hands-on exploration of the shooting location allows them to familiarize themselves with the physical space, understand its unique characteristics, and identify the best angles and lighting conditions. Location scouting is not just a physical endeavor; it’s a creative endeavor to find the most promising settings for the shoot.   Packing Essentials Packing is a deliberate process. It’s about selecting the right tools for the job. Depending on the nature of the shoot, professional photographers must carefully choose the appropriate lenses, lighting equipment, and props. Efficient packing is not only about having everything needed but also about being organized and prepared for any scenario that may arise during the shoot.     3. On Location: A Photoshoot Day Setting Up Setting up for a photoshoot is akin to orchestrating a stage. Lighting equipment, backgrounds, and props are meticulously positioned. The objective is to create an environment that not only complements the subject but also helps convey the desired atmosphere. Setting up is not just about arranging objects; it’s about creating the stage where the visual story will unfold.   Model or Subject Interaction Photography is a collaborative art. When working with models or subjects, effective communication is paramount. Professional photographers don’t just bark orders; they engage in dialogue. They establish a rapport, provide guidance, and create an atmosphere that encourages the subject to express themselves authentically. Model interaction is not just about posing; it’s about capturing genuine moments and emotions.   Adapting to Conditions No shoot is without its challenges. The weather might change, lighting conditions can fluctuate, and unexpected situations can arise. The ability to adapt swiftly is a hallmark of a professional photographer. It’s not about controlling every aspect; it’s about embracing the unpredictability and using it to your advantage.   Capturing the Shot The moment of capturing the shot is the culmination of the photographer’s skills and creativity. It’s about composing the perfect frame, finding the right balance of exposure, and being in tune with the subject’s energy. It’s not just about pressing the shutter button; it’s about seizing the moment when all the elements align to tell a captivating story.     4. Behind the Camera: Capturing the Moment Composition Composition is the photographer’s visual language. It’s about arranging elements within the frame to create harmony, balance, and visual interest. Composition is not just about taking pictures; it’s about composing visual poetry.   Timing The decisive moment, as Henri Cartier-Bresson coined it, is when everything comes together. Timing is about waiting for that perfect instance when a story unfolds in a single frame. It’s not just about being present; it’s about being patient and perceptive.   Framing Framing is the photographer’s choice of perspective. It’s about how they frame the subject, what they choose to include, and what they leave out. Framing is not just about the subject; it’s about the context that surrounds it.   Technical Skills Technical skills are the photographer’s toolkit. It’s about mastering the camera’s settings, understanding exposure, and using the equipment to achieve the desired outcome. Technical skills are not just about pressing buttons; they’re about translating creative ideas into technical reality. These aspects of a professional photographer’s day are not isolated events; they are interconnected elements that, when orchestrated effectively, result in compelling and impactful images. If you have any more questions or would like to explore a specific aspect of professional photography in greater detail, please feel free to ask!     5. Post-Processing and Editing Culling Culling is the process of reviewing all the images captured during a shoot and selecting the best ones. This step involves carefully analyzing each image, considering factors like composition, sharpness, and the expression of the subject. Culling is not just about selecting images; it’s about curating a collection that tells the story effectively.   Editing Editing is where the magic happens. Photographers use editing software to refine their images further. This includes adjusting parameters like exposure, contrast, color balance, and saturation. It’s also the stage where creative decisions are made, such as adding filters or effects to enhance the desired style. Editing is not just about retouching; it’s about elevating the images to their full potential.   Enhancing Creativity Post-processing provides a canvas for creative expression. It’s where photographers add their personal touch to the images. This could

Behind the Lens: A Day in the Life of a Professional Photographer Read More »

paint, makeup, girl-2985569.jpg

The Art of Portraiture: Posing and Lighting Techniques

Portraiture is a form of art that goes beyond mere photography. It’s about capturing the essence of an individual, conveying their personality, emotions, and story through a single image. To achieve this, skilled photographers employ a combination of posing and lighting techniques. In this comprehensive guide, we will explore the intricate world of portraiture, uncovering the secrets of how to create compelling portraits that stand out.   Table of Contents Introduction The Importance of Posing Mastering Posing Techniques The Role of Lighting in Portraiture Lighting Techniques for Portraits Balancing Posing and Lighting Common Mistakes to Avoid FAQs: Your Portraiture Questions Answered Conclusion Introduction Portraiture is an art form that has fascinated us for centuries. It’s the art of capturing the human soul within the confines of a frame. This guide will unveil the secrets behind achieving captivating portraits by focusing on the two core elements: posing and lighting.   <a id=”Importance”>The Importance of Posing</a> Posing is the backbone of portraiture. It’s not just about instructing your subject to stand a certain way; it’s about guiding them to convey their personality and emotions. Here’s why posing is so crucial: – Body Language Speaks Volumes: Every angle and tilt of the head, every placement of hands, and every shift in posture communicates something. Posing is your language to direct this conversation. – Storytelling: A well-posed portrait can tell a story. Whether it’s the confidence of a corporate executive, the vulnerability of a child, or the love between a couple, posing can encapsulate these narratives. – Emotion Elicitation: Certain poses can bring out specific emotions. For example, a relaxed pose can convey comfort, while a dynamic pose can radiate energy and passion. Mastering Posing Techniques Mastering posing techniques is an art in itself. Here’s a glimpse into the subtleties that professional photographers employ: – Paying Attention to Details: It’s the small details that matter. Directing your subject to slightly lift their chin, relax their shoulders, or shift their weight can make a significant difference. – Guiding Facial Expressions: The face is where emotions are most evident. A slight smile, a furrowed brow, or a relaxed jawline can change the entire mood of a portrait. – Posing with Purpose: Posing isn’t arbitrary. It should reflect the subject’s personality and the desired message. For instance, a fashion model’s pose will differ from a business professional’s. The Role of Lighting in Portraiture Lighting is the painter’s brush in portraiture. Understanding its role is pivotal: – Setting the Mood: The direction, intensity, and color of light set the emotional tone of the portrait. Soft, diffused light can create a gentle, romantic mood, while strong, directional light can evoke drama. – Emphasizing Features: Lighting can accentuate or soften facial features. By controlling shadows and highlights, you can bring out the best in your subject. – Creating Depth: Lighting techniques like chiaroscuro (strong contrast between light and dark) can add depth and dimension to the portrait, making it more visually engaging. Lighting Techniques for Portraits Exploring different lighting techniques is akin to expanding your color palette. Here’s a look at some of the key techniques: – Rembrandt Lighting: Named after the famous painter, this technique creates a small triangle of light on the cheek that’s opposite to the light source. It adds depth and is excellent for classic, dramatic portraits. – Butterfly Lighting: This technique places the main light source directly in front of the subject, slightly above eye level. It produces a distinctive butterfly-shaped shadow under the nose, giving a flattering, elegant look. – Split Lighting: Here, the face is divided into two halves—one in shadow, the other in light. It’s ideal for creating a bold and dramatic effect. Balancing Posing and Lighting Achieving a balance between posing and lighting is where the magic happens. It’s about knowing how to adjust your subject’s pose to harmonize with the chosen lighting technique. For instance, if you’re using Rembrandt lighting, you’d guide your subject to turn their face slightly to allow the characteristic triangle of light to appear. Common Mistakes to Avoid In the quest for perfect portraits, it’s important to be aware of common pitfalls. Some mistakes include over-posing (making the subject appear unnatural), poor lighting choices (resulting in unflattering shadows), and neglecting the subject’s comfort (which can lead to stiff or uncomfortable expressions). By learning to avoid these errors, you can create more authentic and compelling portraits. FAQs: Your Portraiture Questions Answered 8.1. What is the best lens for portrait photography? The choice of lens depends on your style and the desired effect. A prime lens with a wide aperture, such as an 85mm f/1.8 or 50mm f/1.4, is popular for its ability to create a pleasing background blur (bokeh) and isolate the subject. 8.2. How can I make my subjects feel more comfortable during a photoshoot? Creating a relaxed and friendly atmosphere is key. Engage in conversation, offer positive feedback, and give clear, encouraging directions. A pre-shoot meeting can help build rapport. 8.3. What is the golden hour, and why is it important for portraits? The golden hour is the period shortly after sunrise or before sunset when the sun casts a warm, soft, and directional light. This type of lighting is often considered ideal for portraits due to its flattering qualities and beautiful ambiance. 8.4. How do I choose the right background for a portrait? Select a background that complements your subject and the mood you want to convey. For formal portraits, a solid, neutral background may work best. In outdoor settings, consider backgrounds that offer depth and context. 8.5. What is the key to capturing authentic expressions in portraits? Authentic expressions are often revealed through genuine interaction and patience. Engage with your subject, make them comfortable, and be ready to capture candid moments when their true self shines through. Conclusion Portraiture is an intricate art that combines the technical aspects of posing and lighting with the creative pursuit of storytelling and emotion. By mastering these elements, avoiding common pitfalls, and embracing your subject’s authenticity,

The Art of Portraiture: Posing and Lighting Techniques Read More »

camera, gear, objects-2618321.jpg

Photography Gear Essentials: Must-Have Equipment for Every Photographer

Photography is an art that demands both creativity and the right tools. Whether you’re an amateur or a professional, having the right gear is essential to capturing the perfect shot. In this comprehensive guide, we’ll explore the must-have equipment for every photographer, providing insights into the purpose and significance of each piece of gear.   Table of Contents Introduction Camera Bodies: Choosing the Right One Lenses: Your Window to the World Tripods and Stabilization Lighting Equipment: Shaping Your Shots Camera Bags and Cases: Protecting Your Investments Accessories: Enhancing Your Creativity Common Mistakes to Avoid FAQs: Your Photography Gear Questions Answered Conclusion   Introduction Photography is a beautiful blend of art and technology. The right equipment is the foundation of any photographer’s creative journey. In this guide, we’ll break down the essential gear that every photographer should consider. Camera Bodies: Choosing the Right One Selecting the right camera body is a pivotal decision for any photographer. Here’s an in-depth look at the different options: – Compact Cameras: These are small, lightweight cameras that are ideal for casual and on-the-go photography. They’re perfect for everyday use and travel due to their portability. Many compact cameras offer advanced features like manual modes and good image quality.   – DSLRs (Digital Single-Lens Reflex): DSLRs are favored by both beginners and professionals for their versatility and image quality. They offer interchangeable lenses and the ability to control settings manually. The optical viewfinder provides a direct view through the lens, allowing for precise composition.   – Mirrorless Cameras: Mirrorless cameras are compact and lightweight, making them excellent for travel and street photography. They lack the mirror mechanism of DSLRs, which reduces their size. These cameras often feature electronic viewfinders and offer impressive image quality.   – Full-Frame vs. Crop Sensor: Another consideration when choosing a camera body is the sensor size. Full-frame sensors offer excellent low-light performance and depth of field control. Crop sensors are smaller but can be advantageous for wildlife and sports photography due to their effective reach.   Lenses: Your Window to the World Lenses are your artistic tools in photography, and selecting the right one can greatly impact the outcome of your images. Let’s explore further:   – Prime Lenses: Prime lenses have a fixed focal length and do not zoom. They are known for their sharpness, wide apertures, and ability to create a beautiful background blur (bokeh). Common prime lenses include 50mm f/1.8 and 85mm f/1.4.   – Zoom Lenses: Zoom lenses offer versatility by covering a range of focal lengths. For example, a 24-70mm lens provides wide-angle to short telephoto capabilities. They are excellent for capturing a variety of subjects without changing lenses.   – Wide-Angle, Standard, and Telephoto Lenses: These categories cater to specific needs. Wide-angle lenses (e.g., 16-35mm) are great for landscapes, architecture, and creative perspectives. Standard lenses (e.g., 50mm) offer a natural field of view for portraits and everyday scenes. Telephoto lenses (e.g., 70-200mm) bring distant subjects closer, making them suitable for wildlife and sports photography.   Tripods and Stabilization Stability is crucial for various photography scenarios, and having the right support equipment is essential. Here’s an in-depth look:   – Tripods: Tripods provide stability and are crucial for long exposures, macro photography, and capturing details in low light. When selecting a tripod, consider its load capacity, weight, and the materials used (aluminum or carbon fiber).   – Monopods: Monopods are a portable alternative to tripods. They offer stability while allowing more mobility. They are especially useful for sports and wildlife photographers who need to pan quickly and follow fast-moving subjects.   – Image Stabilization: Some camera bodies and lenses come with built-in image stabilization (IS or VR). This technology minimizes the effects of camera shake and is valuable for handheld shots at slower shutter speeds.   Lighting Equipment: Shaping Your Shots Lighting plays a significant role in photography. Let’s delve deeper into the world of lighting equipment:   – Speedlights: Speedlights are small, portable flashes that attach to your camera’s hot shoe. They’re versatile for various situations and can be used for both on-camera and off-camera flash photography.   – Softboxes: Softboxes are modifiers that create soft, diffused light. They are popular for portrait photography because they reduce harsh shadows and create flattering light. They come in various shapes and sizes.   – Reflectors: Reflectors bounce light back onto the subject, filling in shadows and creating a pleasing, even illumination. They are lightweight and portable and come in various colors, such as white, silver, and gold, for different effects.   Camera Bags and Cases: Protecting Your Investments Protecting your gear is as important as acquiring it. The right camera bag or case can safeguard your equipment and offer convenience during your photography adventures.   – Camera Bags: Camera bags come in various styles, including backpacks, messenger bags, and shoulder bags. They have padded compartments to protect your camera, lenses, and accessories. Consider factors like size, comfort, and weather resistance when choosing a bag.   – Hard Cases: Hard cases are rugged, waterproof cases that provide maximum protection for your gear. They are ideal for travel and when you need to protect your equipment in challenging environments.   Accessories: Enhancing Your Creativity Accessories are the finishing touches to your photography toolkit. Let’s explore these creative enhancements:   – Filters: Filters can alter the characteristics of light entering the lens. For example, a polarizing filter reduces reflections and enhances sky color, while a neutral density filter reduces light for long exposure effects.   – Remote Triggers: Remote triggers allow you to capture images without touching the camera. This is essential for long exposures, astrophotography, and reducing camera shake.   – Memory Cards: Choosing the right memory cards is crucial to ensure fast write speeds and ample storage capacity. Look for reliable brands and consider UHS-II or CFexpress cards for high-performance cameras.   Common Mistakes to Avoid Avoiding gear-related mistakes is crucial for a photographer. Common pitfalls include neglecting proper lens care (leading to dirty or scratched lenses),

Photography Gear Essentials: Must-Have Equipment for Every Photographer Read More »

Scroll to Top